Implementing my Website in Flask - Part 5
Nov 18, 2021
This is part 5 in a series about implementing a personal blog in Python's Flask framework. In this post, I'll cover the deployment to Netlify. I had a really positive experience with Netlify, so this comes off as an advertisement, I want to say that I'm not affiliated - just a happy customer.
If you're interested, other parts of the series can be found below:
- Part 1: Introduction and Project Outline
- Part 2: Setting Up Static Resources and Styles
- Part 3: Flask and Jinja
- Part 4: Managing Posts and Highlighting Code Blurbs
- Part 5: Deployment to Netlify
- Part 6: RSS Feed
And as always, you can find the source of this blog on Github.
Introduction to Netlify
Netlify is a Platform as a Service (PaaS) provider that markets themselves as a platform built for scale, where developers only have to worry about writing code. Instead of leaving it to the developer to manage webservers, set up a CI/CD pipelines, and handle scaling their service, Netlify seamlessly integrates into services like Github to automatically deploy to the cloud.
As I'm currently working on a separate project where I decided to use a barebones AWS EC2 instance instead of a PaaS, I can confidently say that I'll be running back to a PaaS due to the seamless experience. Especially for small teams, it can save an incredible amount of time and provide the confidence that everything under the hood is working correctly.
As if the time savings weren't enough, Netlify provides a free tier of service which provides 100GB of bandwidth, 300 build minutes, and one concurrent build per "team." I find that this is definitely enough for my site, since I'm the only developer on the team, and it's the only website. They also provide Pro, Business, and Enterprise tiers of service.
Hosting a site is rediculously easy. First, you have to connect to a Git provider (Github in my case), then pick a repository, then set your site settings:
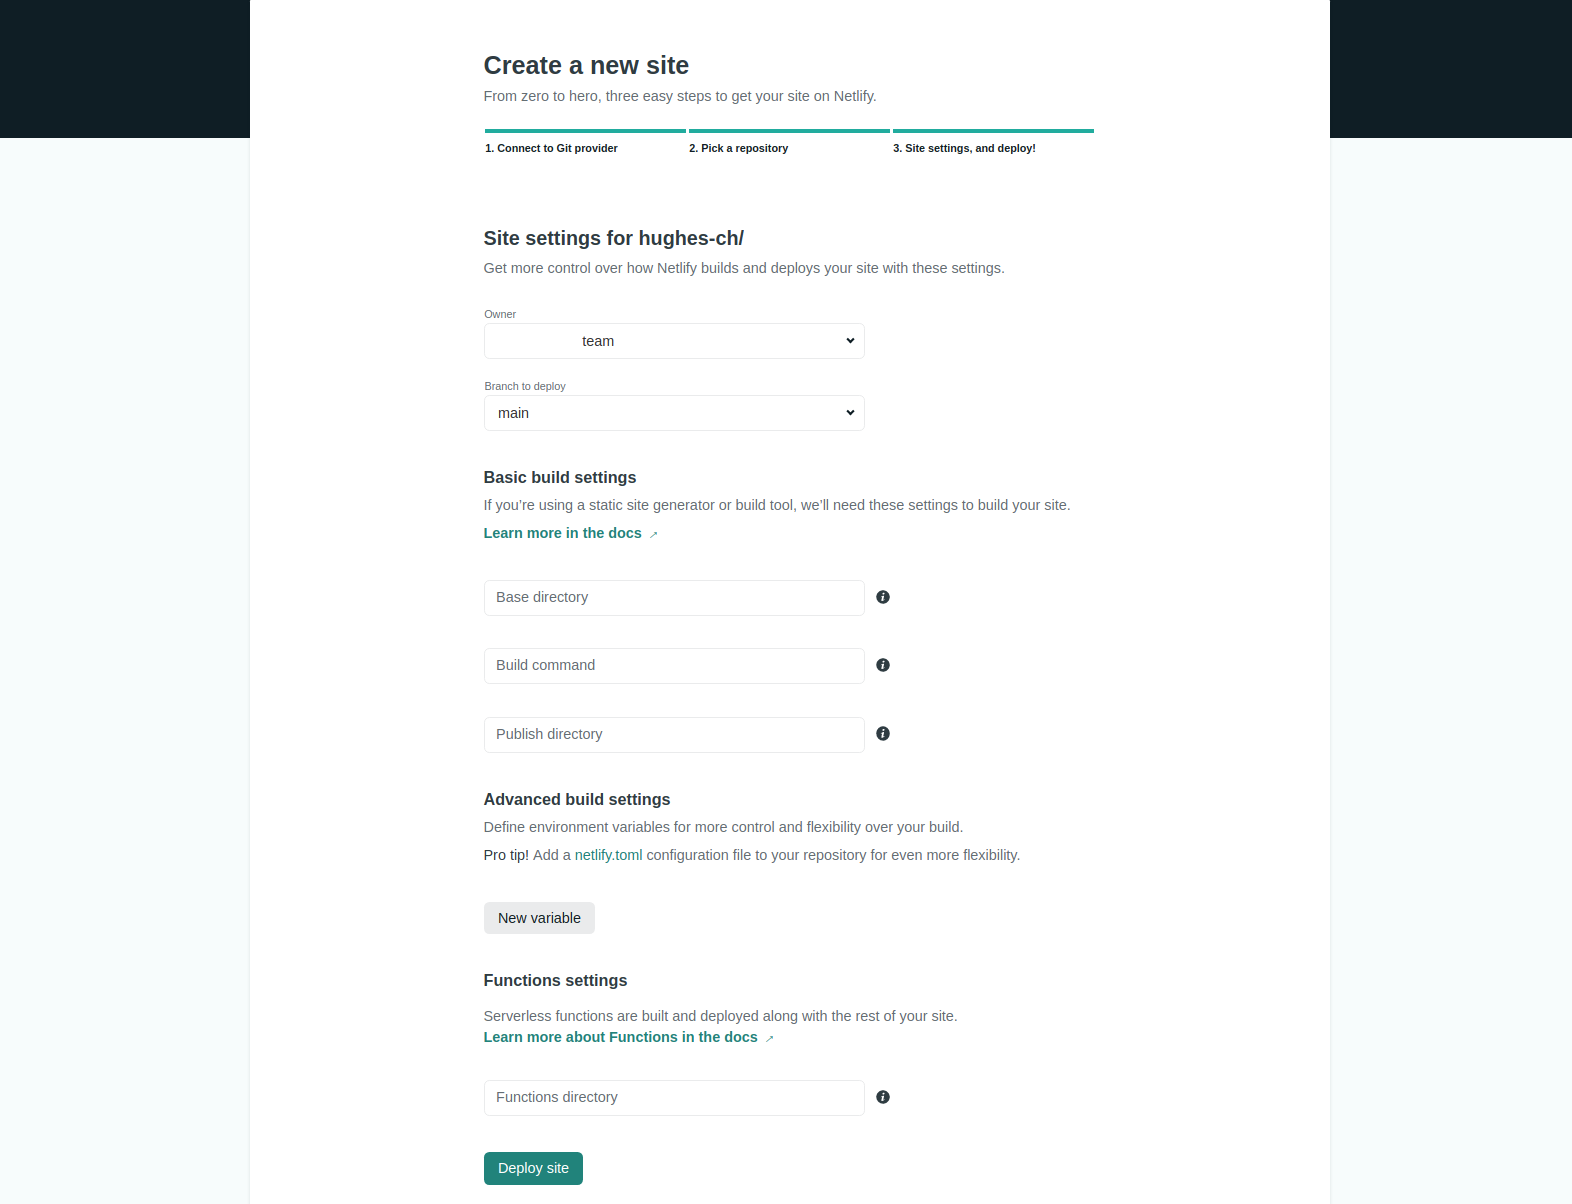
I removed my repo and team name above since it would've confused things, but otherwise you can see how simple this page is. Just add your team name as the owner (you'll create a team when you set up an account), then select the branch to deploy in the repo. In this case, I have the main branch being deployed. Any time 'main' is updated, I get a notification from Netlify that a new build has started. Within a few minutes, the new version of the website is up. During the deployment, there's no downtime.
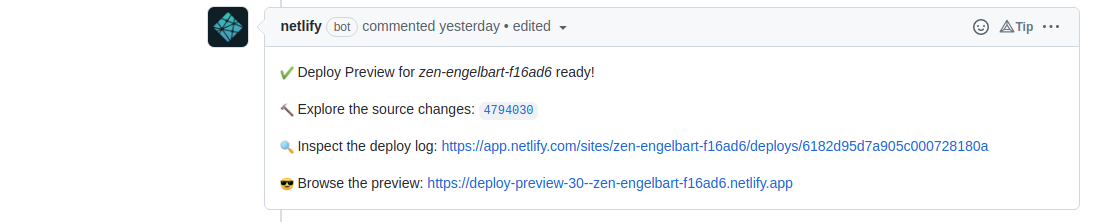
One of the really neat things is that Netlify will also provide staging deployments for all the other branches. It uses the same settings as provided for 'main' to build these branches. So if you make a change and would like to check them out before actually deploying it, Netlify will automatically set up that pipeline for you. When hooked up with a Github account, the preview will automatically start with any push to Github. You can easily access the previews from the pull request, where Netlify will add a comment:
Back to the settings page, to specify a base directory other than the root of your repo, you can set the 'Base directory' to a local directory in your repo. To use the root, leave the setting blank. The 'Build command' setting is any script that needs to run to set up the application. The 'Publish directory' is where the final static resources and scripts can be found in the built repo.
Under 'Advanced build settings', you can add environment variables and serverless functions.
Serverless Architecture
On the topic of serverless functions, one of the things to keep in mind with Netlify is that it is a completely serverless architecture. It can serve static content, but any dynamic features (like API requests) must be defined solely with the function interface. The Netlify service handles all of the incoming traffic and provides your function code with single events to process. It recommends making each function stateless and short lived.
A really basic example of a Javascript function from their website is the one below:
1
2
3
4
5
6
exports.handler = async function(event, context) {
return {
statusCode: 200,
body: JSON.stringify({message: 'Hello World'})
};
}
In this example, event contains all of the information from the request, such
as the method, headers, URL, and any data in the body of the request. According to the docs,
context can have additional information about the client. Any request to this
API endpoint immediately receives the friendly JSON response "Hello World."
The biggest benefit to this serverless architecture is that developers don't need to worry about managing servers or managing a complex DevOps environment. However, it does take some restructuring for apps like mine which need access to the filesystem and run on top of a web server. The fact that functions need to be short lived means that things like Flask and Django are out of the question.
Also, Netlify only accepts functions defined in Javascript and Go at the moment, so it looked like I was going to be out of luck. Bummer.
Frozen-Flask Saves the Day
Luckily for me, there's a way around the serverless architecture. Since my app doesn't use a database or have any dynamic features, it doesn't change between pushes to Github. As far as Netlify is concerned, it can be converted into a static website. My second stroke of luck was that Python has a module called Frozen-Flask that's designed to do just this. When a website is ready to be deployed, this module essentially traverses the entire sitemap, saving each rendered template into a static file soley containing HTML, XML, JSON, etc. From their website: "the result can be hosted without any server-side software."
Sweet! No functions needed, just static hosting. Netlify can do that easily.
With Frozen-Flask, all of my local development is done in Python and Flask. Then on deployment, I just 'build' it - almost like compiled languages like C++. Instead of a binary output though, I get static assets.
Installation is really simple:
$ pip install Frozen-Flask
Then you're ready to freeze your project!
The basic example from their website is intended to be run as a standalone script which imports
the Flask app instance and calls the Freezer.freeze() method on it:
1
2
3
4
5
6
7
from flask_frozen import Freezer
from myapplication import app
freezer = Freezer(app)
if __name__ == '__main__':
freezer.freeze()
In this case, freezer.freeze() traverses the URL structure of the
application, dumping all of the static resources into the 'build' subdirectory of the current
working directory.
While this use case is OK, a more professional solution would be to incorporate Flask-Freeze into Flask's CLI. As we'll see later, it also makes deployment to Netlify a breeze.
For some background, Flask uses the Click project to handle its command line interface. From its website, it markets itself as "a Python package for creating beautiful command line interfaces ... with as little code as necessary." I'm a fan of that.
It turns out adding new command line options certainly meet that promise. The previous example can be written with just a few extra lines of code:
1
2
3
4
5
6
7
8
9
10
11
import flask
from click import command
from flask.cli import with_appcontext
from flask_frozen import Freezer
@command('build')
@with_appcontext
def build():
freezer = Freezer(flask.current_app)
freezer.freeze()
Now we can access this functionality using flask build at the command line,
just like we can use flask run. The first piece to make this work is using
the @command decorator. This lets Click know that there will be a new command
line argument, and that the build() function should be called to execute it.
The second piece is the @with_appcontext decorator. Unlike during requests,
methods invoked through Flask's command line do not automatically get an application context
pushed. This decorator notifies Flask to push a context so that the
flask.current_app proxy is available.
It's also really important to note that the new CLI functions have to be registered with the Flask app at creation time. So wherever you create your app, you'll need to add these lines:
1
2
3
4
from myCliModule import build
from myapplication import app
app.cli.add_command(build)
Some Caveats
This solution works great for most pages, but Frozen-Flask ran into a few issues:
- It wasn't able to find dynamic URLs out of the box
- It didn't find my 404 page since it isn't associated with a URL
- It didn't provide an easy way to run it from the command line
First, let me dive into why my URLs weren't fully discovered...
Frozen-Flask works sort of like a web crawler, using the Flask app definition as a site map. All
of the statically defined routes are rendered and saved as static resources. Then, the dynamically
created URLs are generated in a best-effort fashion. Like web crawlers need incoming links to
discover a website, Frozen-Flask needs calls to url_for to act as an incoming
link. If a page doesn't have incoming url_fors, you need to create
URL generators to specify the full, valid URLs.
One case where this showed itself was in my blog post URLs. Because of the way I have to
pre-load them in Flask, an incoming url_for is never created for them.
Frozen-Flask doesn't has no way to know about their existance. No big deal. To generate the
URL for each post, I could use my
PostList from last blog post. Since it stored the URL of each
post, I could simply loop over it and yield each value:
1
2
3
def yield_blog_post_urls():
for post in PostList():
yield {'name': post.url}
Note that "name" here is the input parameter to the dynamically generated URL.
Then, like the CLI functions, make sure to register the generators with the calling class. In this case, that's the freezer:
1
2
3
freezer = Freezer(flask.current_app)
freezer.register_generator(yield_blog_post_urls)
freezer.freeze()
As another simple example, consider a pagination feature. The generator could simply loop over a
range of numbers up to the maximum page value, yielding the page number as
{'page': num}.
With the URL generators hooked in, all of my dynamic URLs were turned into static resources as expected. But now I hit my second issue while using Frozen-Flask. Since my 404 page isn't tied to a URL, there's no way for Frozen-Flask to find it.
The solution I came up with isn't really pretty, as Frozen-Flask doesn't offer support for this feature. After building all the pages that could be reached with a URL, I rendered the 404 template and wrote it to a file in the same directory as the other files. Here's how it looks:
1
2
3
4
5
6
7
8
with app.test_request_context(base_url=None):
write_path = pathlib.Path(freezer.root) / '404.html'
with write_path.open('w') as f_handle:
context = {
'title': 'Oops! Page not found!',
}
f_handle.write(flask.render_template('_404.html', **context))
Note that the test_request_context is needed here to render the template.
Without it, Flask doesn't know to push a request context and flak.render_template
won't have the resources it needs to generate the template. This is the same procedure that
Frozen-Flask uses under the hood to generate its static files.
Great! Now to test this out...
I elected to integrate this into the Flask CLI so that it would be just as easy to run the
frozen version of the website as it was the regular version. Another benefit was that the code
that ran the "standard" way (with flask run could be completely decoupled with
this new way of running. I decided to call this new command flask run-static.
Now the reason why this effort is in the "caveats" section is because Frozen-Flask was designed
to be run from the Python intepreter, not the Flask command line. Its serve
method (which starts a local server and serves the newly built static resources) calls
flask.current_app.run() under the hood. Turns out Flask's CLI expressly forbids
this. The command fails immediately with this warning:
/personal-website/lib/python3.8/site-packages/flask_frozen/__init__.py:397:
  Warning: Silently ignoring app.run() because the application is run from the flask command line executable.
  Consider putting app.run() behind an if __name__ == "__main__" guard to silence this warning.
  app.run(**options)
Instead of going back to the drawing board (as I probably should have), I decided to hack-and
slash around this. I found that Flask checks the OS environment variable
FLASK_RUN_FROM_CLI to determine if Flask was run from the command line. If
False, Flask allows app.run() to execute as expected.
Other than that caveat, our new command line interface to start a local static file server is really simple. Flask-Freeze does all the heavy lifting:
1
2
3
4
5
6
7
@click.command('run-static')
@click.argument('host')
@flask.cli.with_appcontext
def run_static(host):
os.environ['FLASK_RUN_FROM_CLI'] = 'false'
self.freezer = flask_frozen.Freezer(flask.current_app)
self.freezer.serve(host=host)
The first line defines the command run-static. The second line defines a
command line argument provides the caller to provide an address to host the server on
(typically 0.0.0.0). The third decorator notifies Flask to run the method with
app context so that flask.current_app is available to us. On line 5 is our
environment variable hack, and on line 7 is the call to Frozen-Flask which tells it to start
a local server that hosts our static files.
With those few lines of code, Frozen-Flask serves the static website on our local machine, and everything looks the same as the dynamic website! Except since everything is already pre-rendered, everything is FAST!
While this is a great intermediate step, the Frozen-Flask server isn't robust enough for hosting a web-facing application. So back to Netlify...
Hooking Frozen-Flask into Netlify
For static websites, Netlify needs three build settings so that it knows how to deploy the site:
- The base directory - Serves as the working directory during the deployment.
- The publish directory - Serves as the website root where static content will be served from.
- The build command - Renders static content and places output files into the publish directory.
The easiest way to specify these settings is through the Netlify UI. However, they also provide a way to configure projects through the use of a TOML file. I just used the UI for my application.
If you navigate to your site settings and select the 'Build & deploy' tab to the side of the page, you'll see the build settings for the website. I've highlighted them below:

You can see that I left the 'Base directory' setting as not set. This lets Netlify use its default setting which is to use the root of the Git repository. That works for this project.
Next, to stage everything in the 'Publish directory,' I've specified that Netlify should use the
flask build command. Now, Netlify will pull all the source from Github and run
flask build from the root of the repo. All that's left to do is to tell it to
look in the right place for the HTML that it needs to serve. That's done with the 'Publish
directory' setting on the third highlighted line.
Alternatively, if you know the settings that you need beforehand, these settings are available to customize when creating a new site (see the image I posted way up at the top of the "Introduction to Netlify" section).
Adding Custom DNS and HTTPS
Netlify will host its web applications with its own domain names, using funny names like
zen-engelbart-f16ad6.netlify.app. If you'd like to use a memorable name, you'll
have to hook in your own domain name.
I used domains.google.com to purchase my domain. Most are pretty cheap. For instance, this one was only $12 for the year. It's also possible to purchase DNS through Netlify if you know that the domain will always be hosted there.
To use one of your own domains, first go to the "Domain management" tab in "Site Settings" in Netlify. There, you'll find the "Custom domains" box with the Netlify domain already listed:
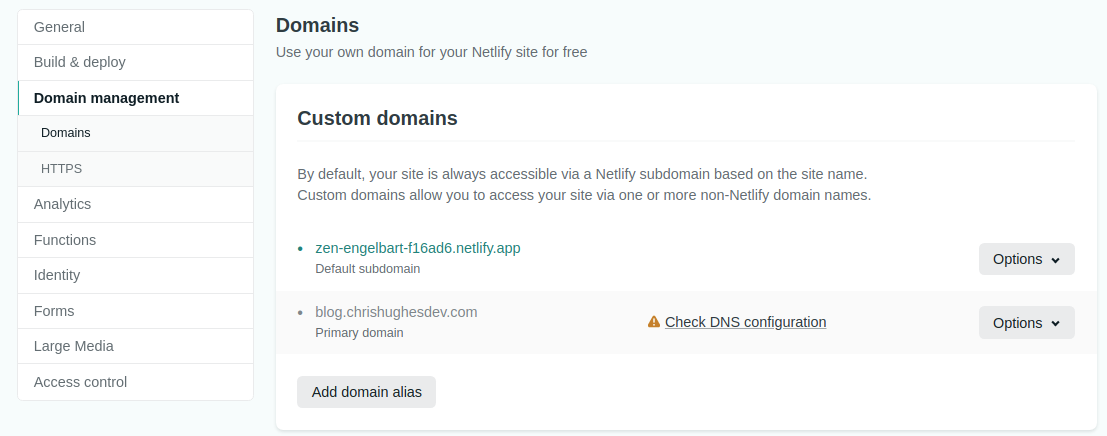
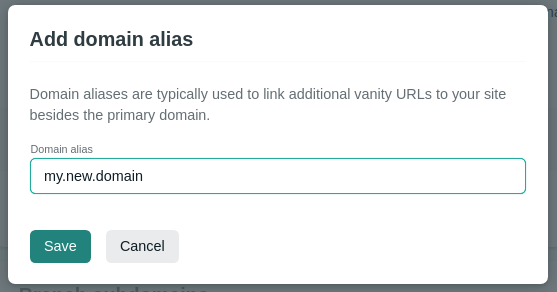
Here, my own domain is already added in the second row. To add a new domain, select "Add domain alias" and enter the desired domain:
Netlify then instructs you to add a CNAME record pointing from your new domain to the Netlify
domain (in this case, zen-engelbart-f16ad6.netlify.app). Note that if you don't
do both steps (so that both sides are aware of the custom domain), you won't be able to access
the application through your new domain.
OK, those few steps were easy, but the easiest one is yet to come. Netlify is freakin' great in that it automatically handles setting up HTTPS for the application. At the bottom of the "Domain management" tab, you'll see this box:
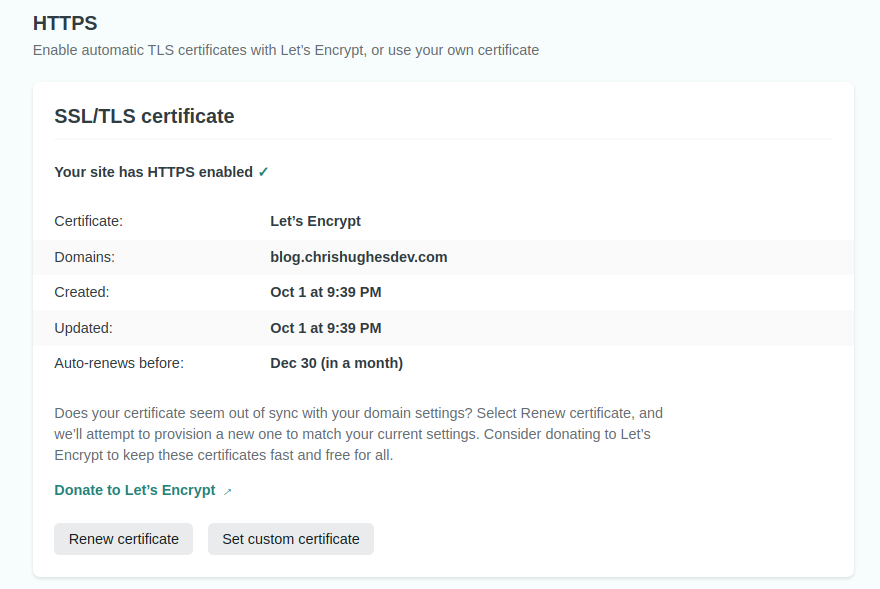
Within about 15 minutes of getting your custom domain set up, Netlify will provision a TLS certificate from Let's Encrypt and your application will have HTTPS enabled. Even better, it renews it periodically so you never have to worry about it. Don't even have to press a button.
Summary
With that, my website was available for all to see. With Netlify, I was able to get the speed of a static website while using the development power of a Python web development framework. Plus, I'm confident my app will be secure and available to whoever wants to look at it. I don't even need to manage anything besides my application software.
Plus, Netlify even offers shiny badges for your Github page!

... and everyone knows that's what makes a good Github repo - how many status badges it has.
Next time, I'd like to cover one more topic about the blog, mostly because I haven't seen many good tutorials online. That topic is a shorter one - how to manually add RSS.