Implementing my Website in Flask - Part 1
Sep 28, 2021
This is part 1 in a series about implementing a personal blog in Python.
If you're interested, other parts of this series can be found below:
- Part 1: Introduction and Project Outline
- Part 2: Setting Up Static Resources and Styles
- Part 3: Flask and Jinja
- Part 4: Managing Posts and Highlighting Code Blurbs
- Part 5: Deployment to Netlify
- Part 6: RSS Feed
If you are interested in further details, you can find the source of this blog on Github.
Introduction
Like a lot of engineers who want to have a cool personal website, my first attempt at one was using a drag-and-drop website builder. In my case, I used Wix.
It didn't turn out too bad, and it allowed me to add some blog posts and create an online presence. I also got to learn a little bit (OK a real little bit) about DNS. However, I found that their shiny, professional templates were probably marketed more towards travel bloggers than someone like me. I wanted simple. Also, I needed a little bit more customization, like syntax highlighting.

I think the thing that drove me up the wall the hardest was that any code block had to be a separate piece of HTML. There was no way to use common CSS, common scripts, etc.
So in order to make this:
1print('hello world!')
I'd have to copy/paste this into the Wix editor:
1
2
3
4
5
6
7
8
9
10
11
12
13
14
15
16
17
18
19
20
21
22
23
24
25
26
27
28
29
30
31
32
33
34
35
36
37
38
39
40
41
42
43
44
45
46
47
48
49
50
51
52
53
54
55
56
57
58
59
60
61
62
63
64
65
66
67
68
<style>
:root {
--code-background: #f3f3f3;
--code-padding: 1em;
--line-no-text-color: grey;
--link-block-margin: 1em;
--max-width: 50em;
--title-color: #ff7600;
--variable-font-size: inherit;
}
code { background-color: var(--code-background); }
table.highlighttable {
background-color: var(--code-background);
padding: var(--code-padding);
table-layout: fixed;
width: 100%; }
table.highlighttable tr { vertical-align: top; }
table.highlighttable .code { padding-left: 5px; width: 100%; }
table.highlighttable .highlight { padding: 0px; }
table.highlighttable .linenos {
border-width: 0px 8px 0px 0px;
border-style: solid;
border-color: lightgrey;
color: var(--line-no-text-color);
padding-right: 5px;
text-align: right;
width: 2em;
}
pre { line-height: 125%; }
td.linenos .normal {
color: inherit;
background-color: transparent;
padding-left: 5px;
padding-right: 5px;
}
.highlight {
background-color: var(--code-background);
padding: var(--code-padding);
}
.nb { color: #008000 }
.s1 { color: #BA2121 }
</style>
<code>
<table class='highlighttable'>
<tr>
<td class='linenos'>
<div class='linenodiv'>
<pre>
<span class='normal'>1</span>
</pre>
</div>
</td>
<td class='code'>
<div class='highlight'>
<pre>
<span></span>
<code>
<span class='nb'>print</span>
<span class='p'>(</span>
<span class='s1'>'hello world!'</span>
<span class='p'>)</span>
</code>
</pre>
</div>
</td>
</tr>
</table>
</code>
Every time! And I wouldn't even be able to use Emacs! Yikes! Never mind if I had a long piece of code I needed to highlight or something needed to change.
Plus, how could I call myself a web dev if I didn't code my own website?
Anyways, after working through the Real Python Course I felt pretty confident about Flask, so I thought I'd give it a shot. Plus, I'd imagine there'd be minimal database interaction, minimal forms, minimal everything. The lightweight Flask architecture seemed like the right bet in comparison to the heavier web2py or Django frameworks. I wanted some dynamic aspects to my site, though, so I stayed away from the static serving technologies like Apache or nginx.
I think it turned out pretty OK! If you'd like to take a look at the source code, you can find it on Github.
Over the next few blog posts, I'd like to cover some of my design choices and roadblocks that I nevertheless ran into, even in a simple application like this one. In this first post, I'll just cover the layout of the project and the basic look/feel of the entire website.
Project Definition
My first step was to clearly define what I wanted. Scope creep is the enemy of getting projects done on time, so I knew I had to set a clear definition of done. With that, I broke my website into a few really coarse features:
- A blog with a simple pagination feature to show the latest posts
- An archive to quickly access all my posts
- An "About Me" page which decribes who I am and what I provide
- A resume
- Contact information
- My own domain which can be found on Google
From there, I broke down each coarse feature into bite sized pieces that didn't look too hard to code. For example, a "blog with pagination" could be somewhat advanced. Think auto-loading when a user scrolls, a rich editor, beautiful imagery, etc. However, a code blog with a single contributor could be made pretty simple. For instance, I could just write my blog posts in html. No need for a rich editor in the application itself. Imagery could be really simple: just a few graphs to explain CSS concepts.
The background and color scheme could be really simple too. The focus should be on the content anyways.
One thing that's a little different than your typical Wix blog is the need for syntax highlighting in my code snippets. I knew I wouldn't be able to do that by hand with HTML/CSS, but if I was using Flask, I knew there'd be a Python library which could do that for me.
As a note, there's one thing that I keep coming back to as I develop my blog. I actually don't need a database for this website structure. The only "dynamic" content is the blog posts, which are actually defined in somewhat static HTML files. So do I even need Flask? The answer I keep coming back to is this: some of the pseudo-dynamic content (pagination, SEO) would have to be re- done manually (or by a script) each time I added a new blog post. If I find that Flask is too slow, I might have to take that route. However, I'd like things to be as dynamic as possible. My vision is to simply publish a new blog post and for Flask to update the SEO, pagination, and blog post contents. We'll see if I change my opinion in the future.
With my much more concrete definition of what I'm looking for in my blog, a "blog with pagination" takes more shape. Here's some of the bite-sized steps I laid down for myself:
- Rendering of index page in a simple image editor or PowerPoint
- Create index page in HTML/CSS on local machine
- Ensure that index page is mobile friendly
- Render code (no syntax highlighting yet)
- Transfer blog posts from Wix to new git repository
- Dynamically render latest posts
- Pagination
- Syntax highlighting
To keep track of all these steps (and define a definition of done for each one), I used the Jira software tools. It was actually my first time using them. Coming from the old ticket system from the enterprise company I used to work with, it was a treat to use. Of course, everything's easier when there's just one dude on the team...
Sketching the Index Page
With something concrete to tackle, I went to work on rendering the index page.
I'm currently using Ubuntu Linux, and I found the Gimp software manipulation tool to be really helpful. It has a little bit of a learning curve, but I came up with a really rough outline of what I wanted.
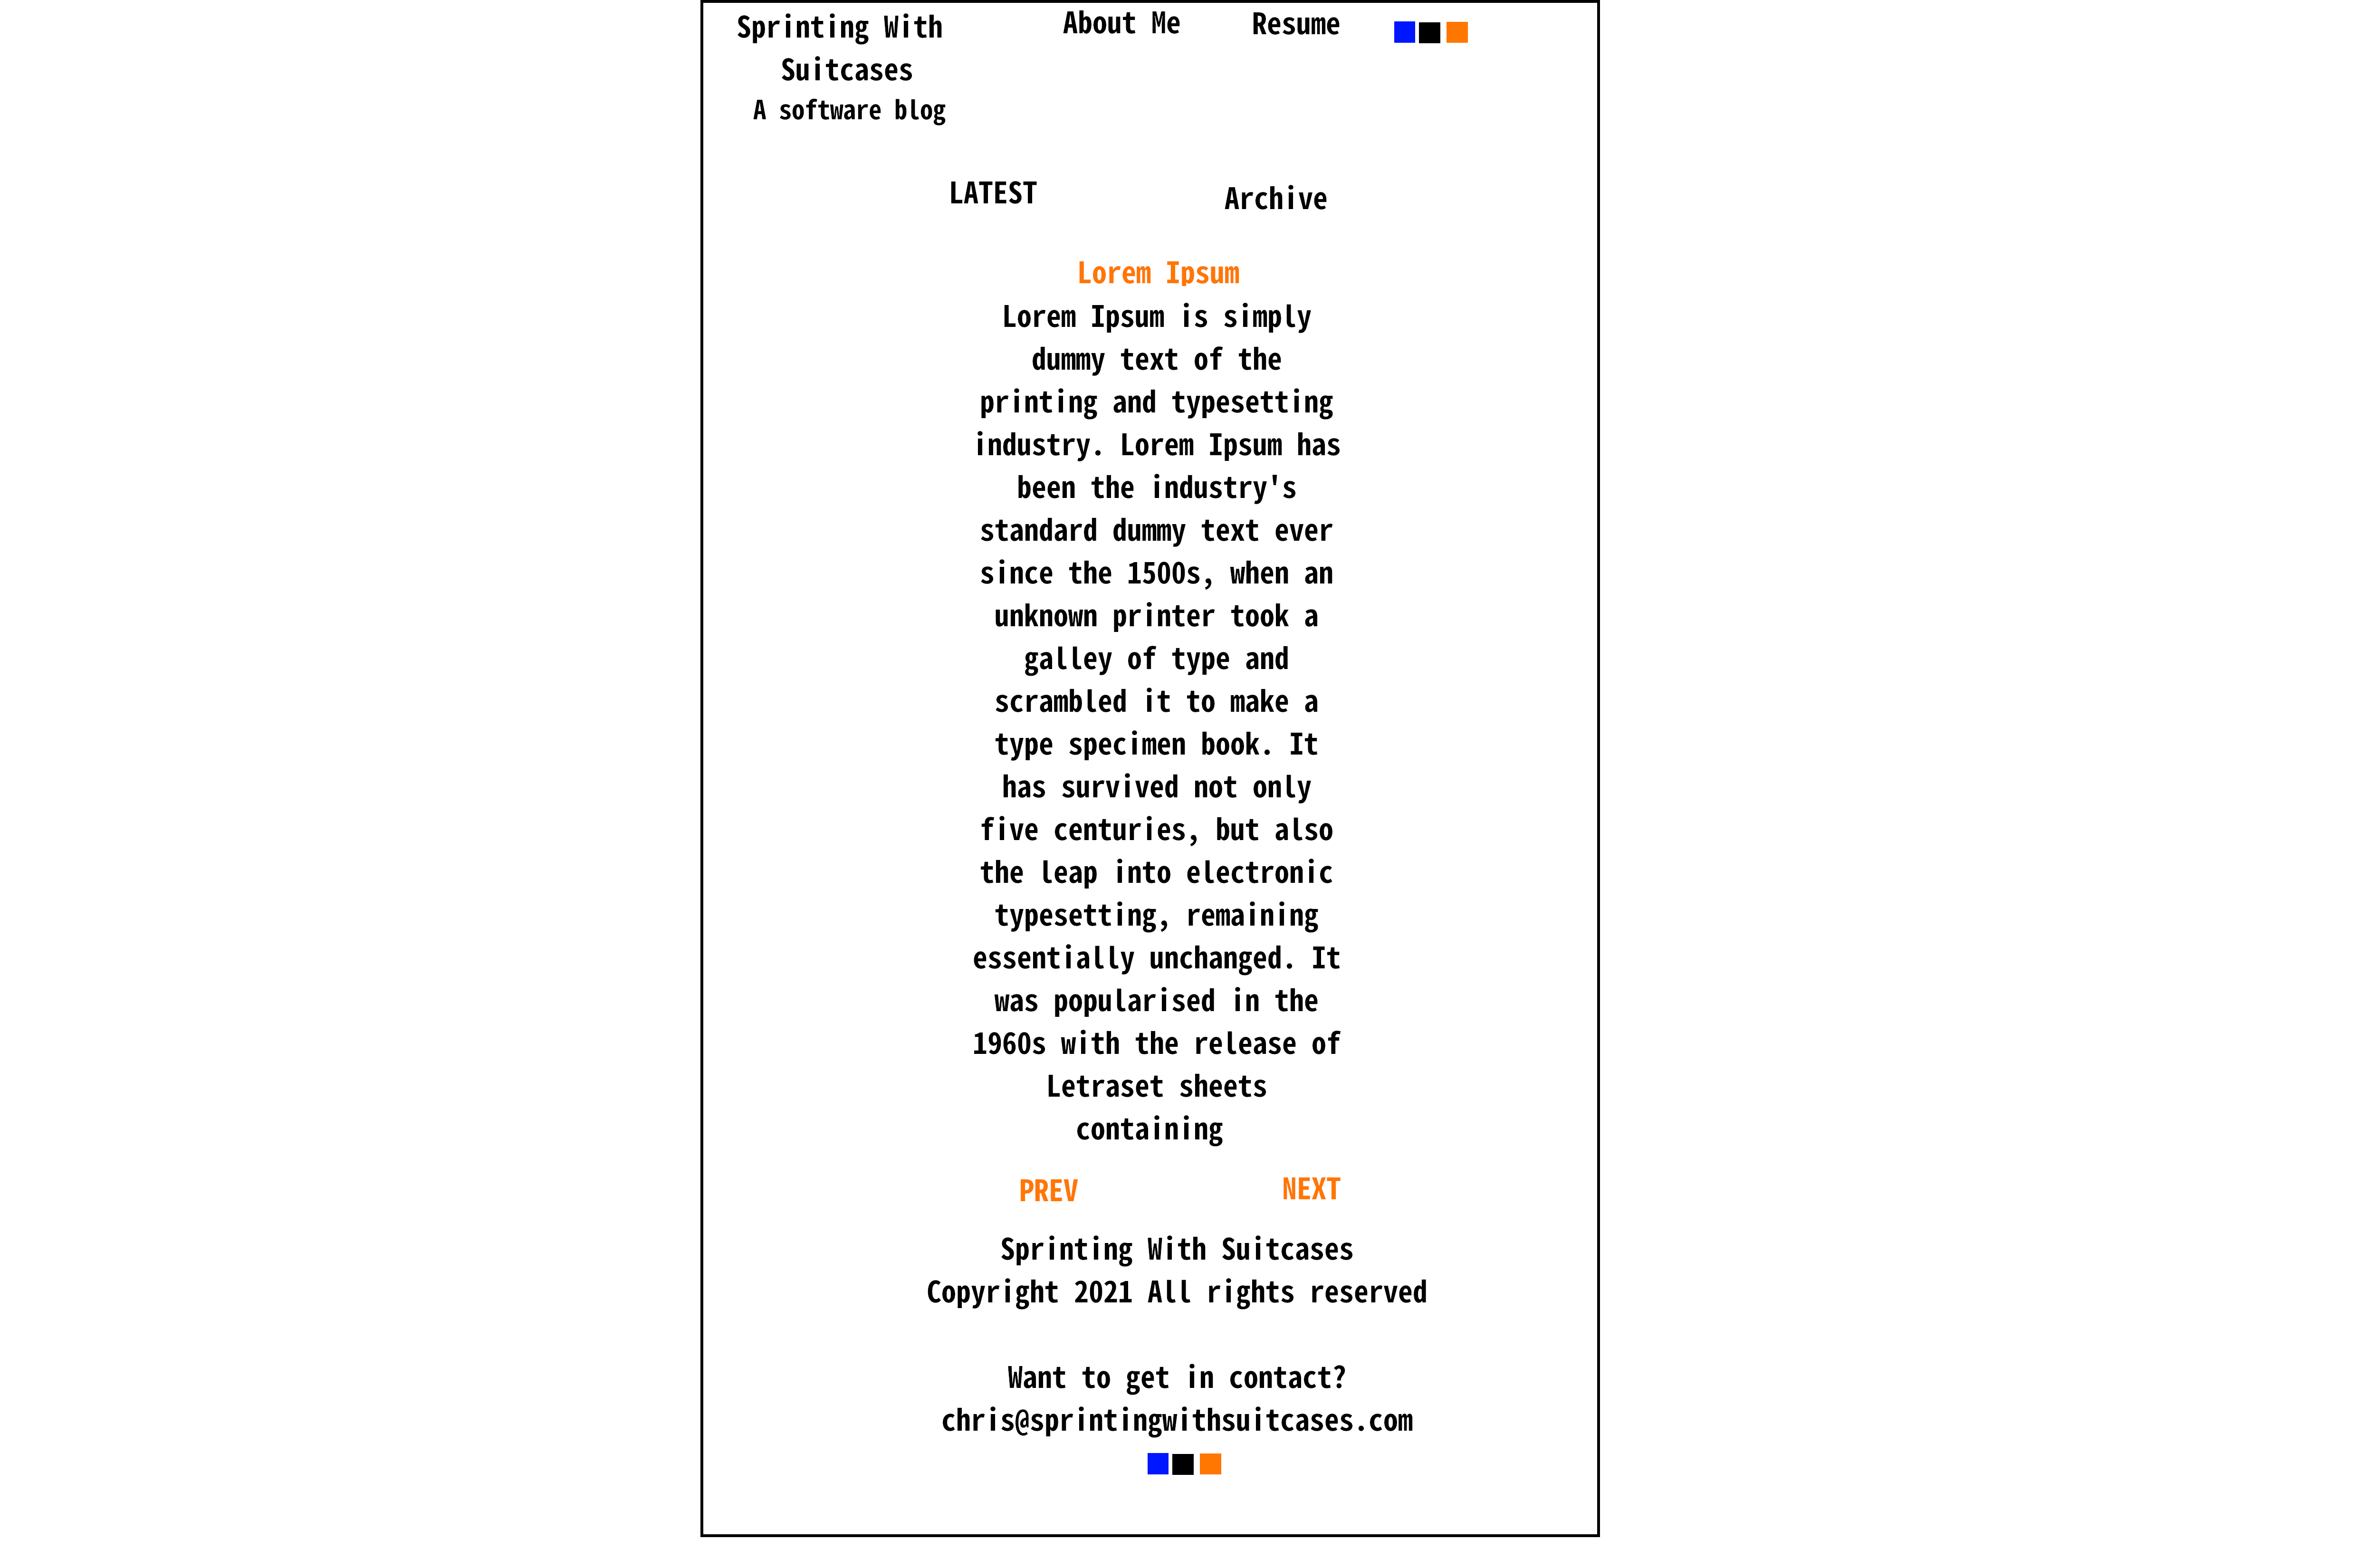
Again, the goal was to keep it simple, with easy controls and access to my contact info and social media accounts (the blue, black, and orange boxes in my sketch). The "Lorem Ipsum" text was my hypothetical blog post. The 'LATEST' and 'Archive' links accessed the latest post (what I envisioned would be the index page) and the entire list of posts, respectively. You can see the final design of my blog matches pretty close to what I had originally drawn out. The only differences were moving the 'Archive' link to the header and removing the 'LATEST' link. Both changes were just for simplicity. I guess I also changed the name of the blog... Rebranding, you can call it.
My intent was for all the other pages to match the format of this one. Essentially, the 'About Me' page, the 'Resume' page, and the Archive, would be considered pseudo-articles, just with different content from the regular blog posts. In the interest of saving time, I only sketched the index page and intended to use the same CSS for all the other pages. So now to organize the structure of the project...
Project Layout
While in the beginning, I could get away with a haphazard layout due to how small the project was, I eventually needed to organize into a proper flask project. Here's how it now looks:
/proj/personal-website/
|----src/
|    |----static/
|    |    | ----css/
|    |    | ----doc/
|    |    | ----icon
|    |    | ----img/
|    |    | ----js/
|    |----templates/
|    |    |----post/
|----test/
|----LICENSE
|----README.md
|----requirements.txt
Code (.py files) is in src. Associated unittest code is in test to keep it distinct from the production code.
Any static resources (images, plain HTML, my resume, etc) are in a subdirectory of static.
Any HTML is in templates, or the 'post' subdirectory. I chose to keep blog posts separate from my regular templates because they had to be rendered slightly differently. Also, Flask had to be able to tell the difference between a post and a standard template. Keeping them in separate directories seemed like the least expensive way.
The LICENSE and README are for the Github repository. The requirements.txt (empty for now) was intended for pip to install the required Python packages for deployment and additional contributors. I elected to go with a fairly open license for the code, but to reserve all my copyrights for my blog content.
With the layout ready and a concrete goal in mind, I was ready to start coding away! Next post, I'll cover the contents of that original .html file and the rationale for my design.